Quick Answer
To install a centered zipper, sew the garment seam first, baste the zipper opening closed, press the seam allowances open, place the zipper teeth directly under the basted seam, and stitch evenly down both sides so the seam line stays centered over the zipper. After stitching, remove the basting stitches to reveal a neat zipper hidden beneath two even fabric folds.
A centered zipper works well for skirts, dresses, cushion covers, pillow backs, and simple garment openings. It is one of the most beginner-friendly zipper methods because the zipper sits behind the seam rather than being exposed or offset.
You will need a regular zipper, matching thread, pins or fabric clips, a zipper foot, an iron, and a seam ripper. The most important setup detail is alignment: the zipper teeth should sit exactly under the seam, and both stitched sides should be the same distance from that seam.
The basic process is:
- Mark the zipper opening on your fabric.
- Sew the seam below the zipper area with a regular stitch.
- Baste the zipper opening closed.
- Press the seam open.
- Place the zipper face down over the seam allowance, centered on the basted seam.
- Pin or baste the zipper in place.
- Stitch around the zipper from the right side.
- Remove the basting stitches.
Go slowly, press well, and check that the zipper opens before final finishing.
How to Think About This Topic
A centered zipper is easiest to understand as a zipper hidden under a temporary seam. Before the zipper is visible, you treat the fabric as if it has one continuous sewn seam. Then you attach the zipper underneath that seam and remove only the temporary stitches. The fabric folds that were pressed open become the two neat flaps covering the zipper tape.
This mental model helps prevent the most common beginner mistake: trying to “fit” the zipper into an open gap. With a centered zipper, you do not begin with a wide opening. You first create a straight, controlled seam line, then use that line as your guide. The zipper is centered under it.
The seam has two different stitch zones. Below the zipper, the seam is permanent and should be sewn with your normal stitch length. In the zipper opening, the seam is temporary and should be basted with a long stitch length so it can be removed later. The point where these two zones meet is important because it becomes the lower stop of the zipper opening.
For example, if you are adding a centered zipper to the back of a skirt, you would sew the center back seam from the hem up to the zipper stop using a regular stitch. Then you would baste from that stop to the waist edge. After pressing the seam open, the zipper is placed behind the basted portion only.
The same idea applies to a pillow cover. You might sew the pillow seam normally on both ends, leaving the zipper section basted in the middle. Once the zipper is stitched in place, removing the basting creates the opening.
A centered zipper also depends heavily on pressing. Pressing the seam allowances open gives the zipper a flat place to sit and helps the outer fabric fold evenly over the teeth. Without pressing, the zipper may twist, bulge, or look uneven from the outside.
Think of the job in three layers: the visible fabric on top, the zipper tape underneath, and the seam allowance between them. Your goal is to keep all three flat, straight, and centered. If the zipper teeth follow the basted seam and your topstitching is even on both sides, the finished zipper will look balanced.
This is why centered zippers are often recommended for beginners. They teach useful habits: marking, basting, pressing, checking alignment, and sewing evenly with a zipper foot.
Practical Guidance
Start by preparing your fabric pieces according to your pattern. Finish the raw seam allowances first if the fabric frays, because it is harder to do cleanly after the zipper is installed. Zigzag, serge, or use another seam finish suitable for your project.
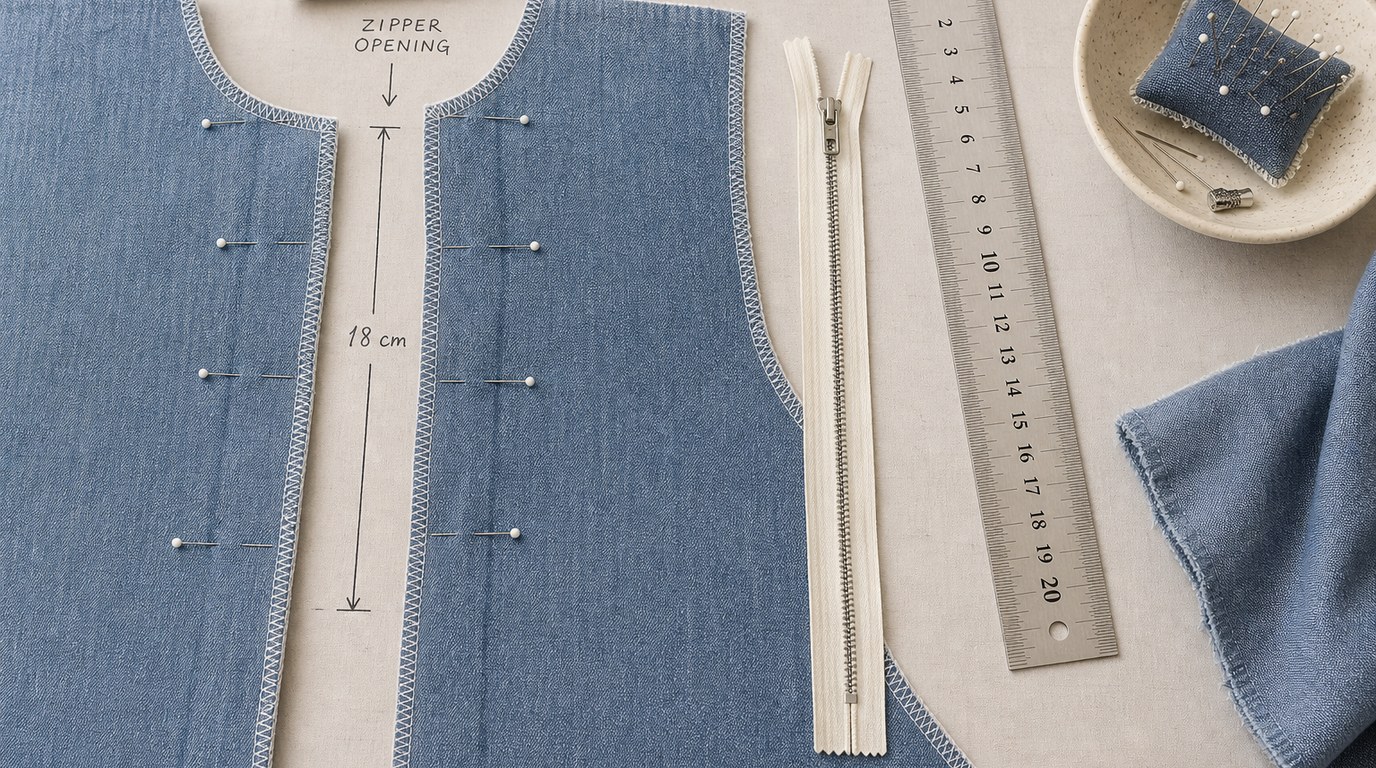
Mark where the zipper opening ends. On a garment, this is usually shown on the pattern. On a pillow or pouch, place the zipper where it will be useful and attractive, leaving enough seam at both ends for strength. The zipper should be long enough for the opening, but not so long that the pull or stops interfere with seam allowances.
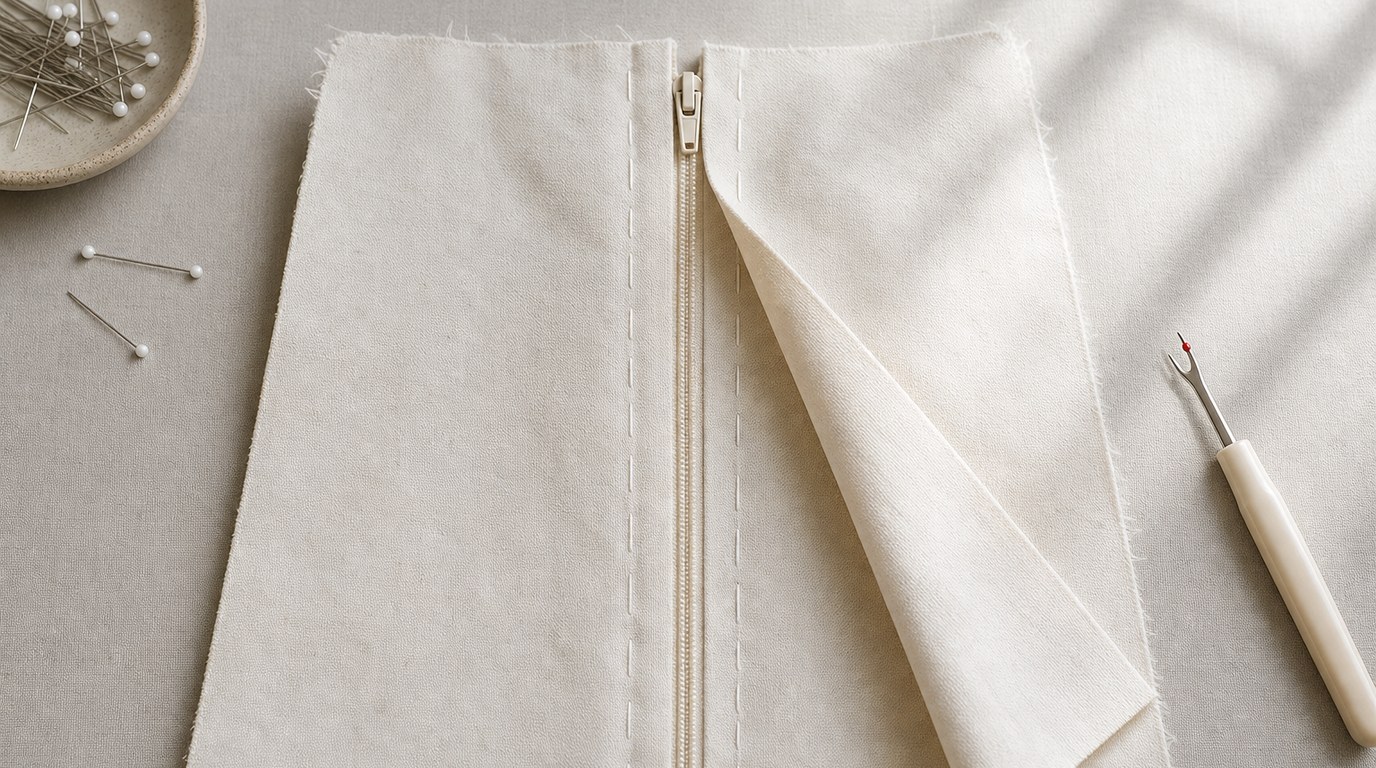
Set your machine to a regular stitch length and sew the permanent part of the seam up to the zipper stop mark. Backstitch at this point. Then switch to a long basting stitch and sew the zipper opening closed. Do not backstitch the basting; you will remove it later.
Press the seam as sewn first to settle the stitches, then press the seam allowances open. Use steam if your fabric allows it. For delicate fabric, use a press cloth. The flatter this seam is, the easier the zipper will be to position.
Place the fabric wrong side up. Lay the zipper face down over the pressed-open seam allowances, with the zipper teeth centered on the basted seam line. The zipper pull should face the fabric, and the tape should lie flat. The top of the zipper should align with the top edge or pattern placement mark.
Pin the zipper tape to the seam allowances, not just to the outer fabric. If the fabric shifts easily, hand-baste the zipper instead of relying on pins. Basting takes a few extra minutes but gives much better control, especially on slippery fabric, lightweight cotton, or curved garment seams.
Turn the fabric right side up. You should see only the basted seam. Using a zipper foot, stitch down one side of the zipper, across the bottom, and up the other side. A common guide is to stitch about 1/4 inch from the seam line on each side, but follow your pattern if it gives a specific distance. Keep the stitching parallel so the finished zipper looks even.
When you approach the zipper pull, stop with the needle down, lift the presser foot, and carefully move the pull out of the way if needed. Lower the foot and continue sewing. Do not force the fabric around the pull, or the stitching line may wobble.
At the bottom of the zipper, sew straight across below the zipper stop. This creates the base of the zipper opening. Make sure you do not stitch through the metal or plastic stop itself. If the zipper is too long, shorten it properly before installation by adding a new stop with strong thread and trimming the excess below your new stop if appropriate for the project.
After topstitching, use a seam ripper to remove the basting stitches from the zipper opening. Work carefully so you do not cut the fabric or the permanent seam. Open and close the zipper to check that it moves smoothly and that no fabric is caught in the teeth.
If the zipper looks uneven, check the cause before ripping everything out. Uneven flaps usually mean the zipper teeth were not centered under the basted seam. Wavy stitching often comes from pulling the fabric while sewing. A puckered zipper may mean the fabric was not pressed flat, the zipper tape stretched, or the fabric needed interfacing.
For stable cotton, linen, or medium-weight fabric, pinning may be enough. For silky, stretchy, or loosely woven fabric, hand-basting and lightweight interfacing along the seam allowance can make the zipper much easier to control. For thick fabric, use a longer stitch length and press carefully to reduce bulk.
A neat centered zipper is less about speed and more about sequence. Mark accurately, sew the seam in two stitch lengths, press open, center the zipper, stitch evenly, and remove the basting. If you follow that order, the technique becomes predictable.
FAQ
What Should a Beginner Know First About How to Install a Centered Zipper?
A beginner should know that the zipper is sewn behind a basted seam, not into an open gap. Sew the seam, baste the zipper area, press it open, center the zipper underneath, stitch around it, then remove the basting.
What Matters Most When Evaluating How to Install a Centered Zipper?
Alignment matters most. The zipper teeth should sit directly under the basted seam, and the topstitching should be even on both sides. Good pressing, accurate marking, and using a zipper foot also make the finished zipper cleaner and easier to sew.
What Mistakes Should Readers Avoid with How to Install a Centered Zipper?
Avoid skipping the basting, failing to press the seam open, or sewing with the zipper teeth off-center. Do not stitch too close to the teeth, pull the fabric while sewing, or forget to move the zipper pull out of the foot’s path.
What Is the Next Logical Step After Learning About How to Install a Centered Zipper?
Practice on fabric scraps before sewing into a garment. Once you are comfortable, try installing a centered zipper in a simple skirt, dress back, or pillow cover. After that, you can compare lapped, invisible, and exposed zipper methods.