DIY quilted hot pads for your kitchen are a practical beginner sewing project: you cut fabric squares, layer them with heat-safe batting, quilt the layers together, and finish the edges with binding. The finished hot pad protects your hands and counters while adding a handmade touch to everyday cooking.
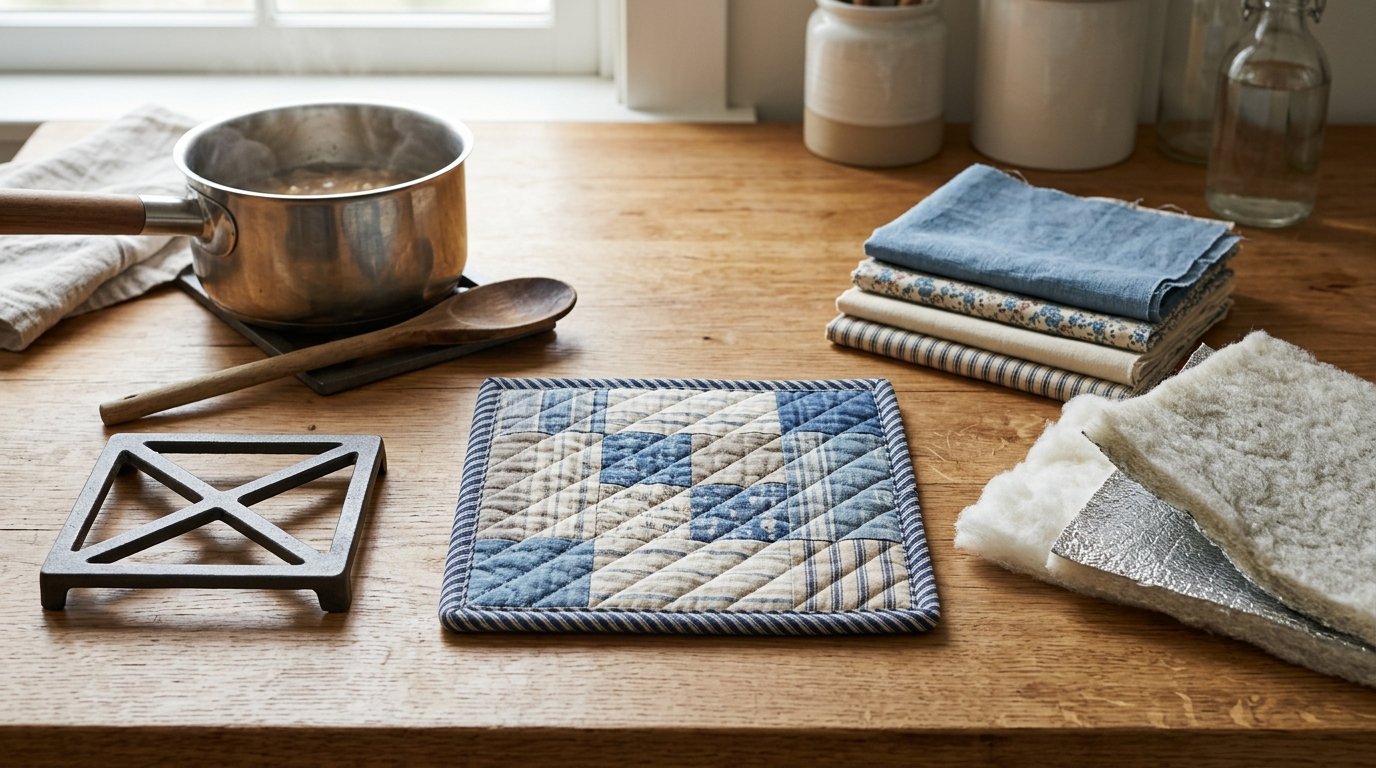
A good hot pad is not just a pretty mini quilt. It needs enough insulation, sturdy stitching, and fabric that can handle kitchen use. Cotton fabric, cotton batting, and an insulated layer such as Insul-Bright are common choices. Avoid synthetic fabrics that may melt near heat.
For a simple first project, make an 8-inch square hot pad with two fabric squares, one layer of cotton batting, one layer of insulated batting, and double-fold binding around the edge.
Quick Answer
To make DIY quilted hot pads for your kitchen, cut two 9-inch squares of cotton fabric, one 9-inch square of cotton batting, and one 9-inch square of insulated batting. Layer them with the backing fabric wrong side up, insulated batting, cotton batting, and top fabric right side up. Pin or clip the layers, quilt straight lines across the square, trim it to 8 inches, then sew binding around the edges. Add a loop if you want to hang it.
For one hot pad, you will need:
| Supply | Suggested Amount | Notes |
|---|---|---|
| — | —: | — |
| Cotton fabric | Two 9-inch squares | Quilting cotton works well |
| Cotton batting | One 9-inch square | Adds softness and thickness |
| Insulated batting | One 9-inch square | Helps reflect heat |
| Binding | About 40 inches | 2½-inch-wide cotton binding |
| Thread | Matching or contrasting | Cotton or all-purpose thread |
The main takeaway: a safe hot pad depends on the right layers. Use 100% cotton fabric on the outside, include heat-resistant insulation inside, and quilt the layers so they do not shift during use.
This project is ideal for scraps, fat quarters, leftover quilt blocks, or seasonal fabric. Make one as a test, then sew a matching pair once you like the size and thickness.
How to Think About This Topic
Think of a quilted hot pad as a small, functional quilt with one extra job: heat protection. A decorative quilt block only needs to look good and hold together. A hot pad must also be thick enough to protect your hand or table from a warm pan. That means your fabric choices and layering matter as much as your stitching.
The basic structure has four parts. The top fabric is the visible design. The batting adds cushion. The insulated layer helps reduce heat transfer. The backing fabric finishes the other side. Quilting stitches lock everything together so the layers stay flat after use and washing. Binding covers the raw edges and gives the hot pad a durable finish.
For beginners, simple is better. Start with whole fabric squares instead of a complicated pieced design. Straight-line quilting is easier to control than dense curves, and a square hot pad is easier to bind than a circle or mitten shape. Once you understand the process, you can use patchwork, half-square triangles, log cabin blocks, or decorative quilting.
Size also affects usefulness. A 7-inch hot pad is compact but may feel small for large pans. An 8-inch square is a good everyday size. A 9- or 10-inch version works well as a trivet for casseroles or serving dishes. If you plan to use the hot pad mostly under hot dishes, make it larger and flatter. If you plan to grab pan handles, make it thick but still flexible.
Safety is part of the design. Use cotton fabric because polyester can melt if it touches very hot metal. Insulated batting improves protection, but it does not make the hot pad fireproof. These pads are for handling warm cookware and protecting surfaces, not for contact with open flames, broilers, or long exposure to extreme heat.
A useful way to plan your hot pad is to ask three questions: Will it be held in the hand or placed under a dish? How much heat will it usually meet? Does it need to be washable? For everyday kitchen use, choose washable cotton, sturdy quilting, and enough insulation that the pad feels substantial without being bulky.
Practical Guidance
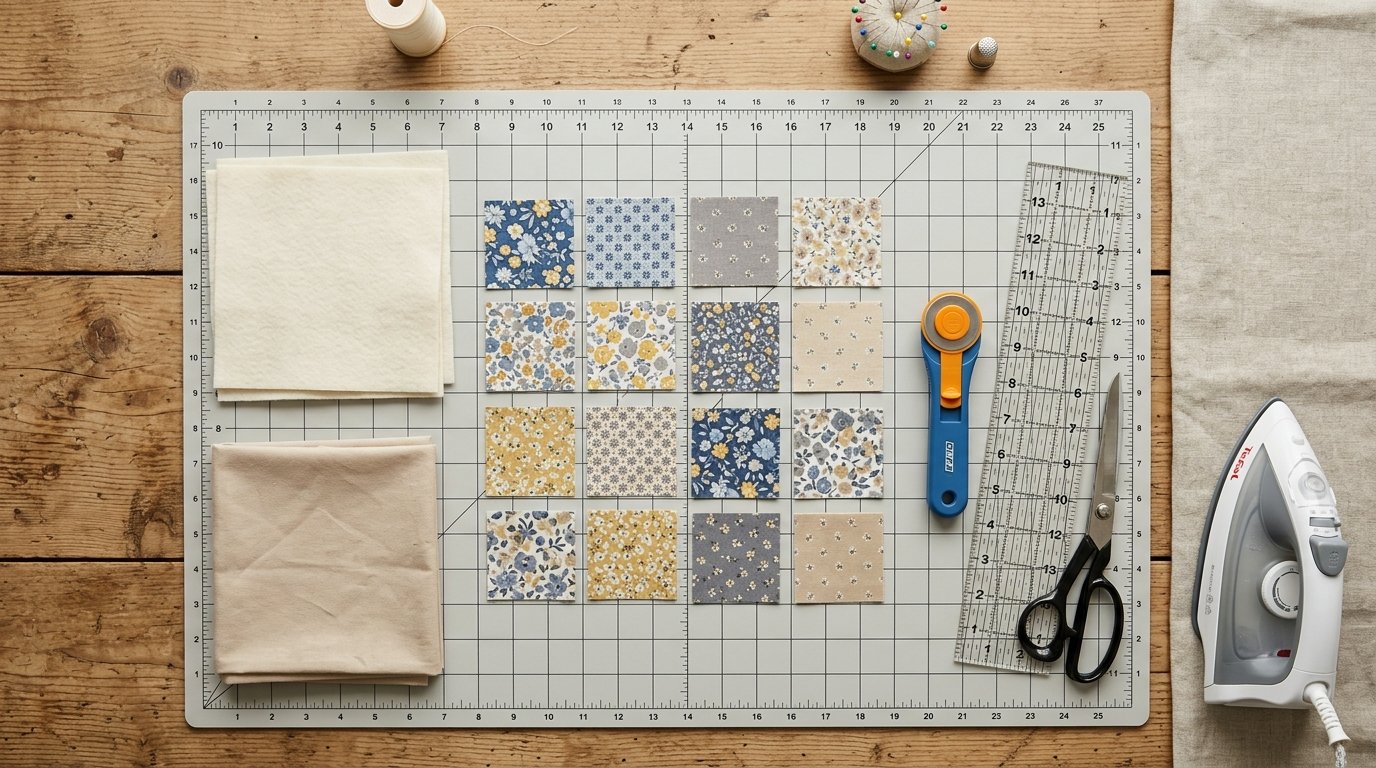
Wash and press your fabric before cutting if you expect to launder the hot pads often. This reduces later shrinkage and helps the finished pad stay square. Cut two 9-inch fabric squares, one 9-inch cotton batting square, and one 9-inch insulated batting square. Starting larger than the final size gives you room to trim after quilting.
Layer the pieces on a flat surface. Place the backing fabric wrong side up. Add the insulated batting, following the manufacturer’s direction if one side is marked. Add the cotton batting, then place the top fabric right side up. Smooth the layers from the center outward and secure them with safety pins, quilting pins, or sewing clips around the edges.
Quilt the hot pad using straight lines. A beginner-friendly option is to sew vertical lines 1 inch apart across the square. Turn the piece and sew horizontal lines 1 inch apart for a simple grid. You can also sew diagonal lines from corner to corner for a classic quilted look. Backstitch at the beginning and end, or shorten the stitch length slightly to secure the quilting.
After quilting, place a ruler on the piece and trim it to an 8-inch square. This step removes uneven edges and makes binding easier. If the hot pad shifted slightly while quilting, do not worry; trimming is expected.
To bind the edges, use about 40 inches of 2½-inch-wide cotton binding. You can use store-bought double-fold binding or make your own. Starting near the middle of one side, align the raw edge of the binding with the raw edge of the hot pad. Sew with a ¼-inch seam allowance, mitering the corners as you go. Fold the binding over to the back and stitch it down by machine or by hand.
For a hanging loop, leave a 4-inch tail of binding at the end, fold it into a loop, and secure it into one corner before finishing. Another option is to sew a separate fabric loop into the corner before binding.
Customize your hot pads by using seasonal prints, leftover quilt blocks, or contrasting thread. For a farmhouse style, use linen-cotton blends only if they are heat-safe and washable. For gifts, sew two matching hot pads and wrap them with a wooden spoon or recipe card.
Before using the hot pad, test it carefully. Place it under a warm dish first, then try it briefly with a hot pan while paying attention to heat transfer. If it feels too thin, add another cotton batting layer in your next version. Do not use a damp hot pad with hot cookware, because moisture transfers heat quickly and can burn your hand.
FAQ
What Should a Beginner Know First About Diy Quilted Hot Pads for Your Kitchen?
Start with safe materials and a simple square shape. Use cotton fabric, cotton batting, and insulated batting rather than decorative synthetic fabrics. An 8-inch square with straight-line quilting is beginner-friendly, useful, and easy to repeat once you understand the layering and binding process.
What Matters Most When Evaluating Diy Quilted Hot Pads for Your Kitchen?
The most important factors are heat protection, durability, and washable construction. A good hot pad should have secure quilting, enclosed raw edges, and enough insulation to feel protective. Pretty fabric is a bonus, but the inside layers determine how practical it is in the kitchen.
What Mistakes Should Readers Avoid with Diy Quilted Hot Pads for Your Kitchen?
Avoid polyester fabric, thin single-layer designs, loose quilting, and unfinished edges. Do not assume any handmade pad is oven-safe just because it is thick. Also avoid using a wet or damp hot pad with hot cookware, since moisture can transfer heat very quickly.
What Is the Next Logical Step After Learning About Diy Quilted Hot Pads for Your Kitchen?
Make one basic hot pad first, then adjust the next one based on how it feels. Try a larger trivet size, add a hanging loop, use patchwork for the top, or sew a matching set. Keeping notes on layers and size helps you repeat your best version.