Beginning quilting is easiest when you understand the process in a simple order: choose fabric, cut accurate pieces, sew them with a consistent seam, press them flat, and join them into a block. You do not need a room full of tools or advanced techniques to start.
For your first project, focus on a small practice block rather than a whole quilt. A four-patch quilt block is ideal because it uses only squares and straight seams. It teaches the most important beginner quilting basics: measuring, cutting, sewing a quarter-inch seam, pressing, and matching seams.
Start with basic cotton fabric, a rotary cutter or scissors, a ruler, pins or clips, thread, an iron, and a sewing machine or hand-sewing needle. The goal is not perfection. The goal is learning how fabric behaves and building confidence one neat seam at a time.
What Quilting Involves: the Simple Mental Model
A quilt is usually made in three layers: the quilt top, batting in the middle, and backing fabric on the bottom. The quilt top is the decorative part, often made from smaller fabric pieces sewn together into blocks.
For beginning quilting, think of the process in stages:
- Cut pieces to the right size.
- Sew pieces together using an even seam allowance.
- Press seams so the block lies flat.
- Join blocks into a larger top if you want to continue.
- Layer, quilt, and bind later.
Your first block is practice for the quilt top stage. If you can cut squares, sew straight seams, and press carefully, you already understand the foundation of quilting.
Essential Tools for Beginning Quilting
You can start quilting with a small, practical tool kit. Specialty rulers, design walls, and advanced quilting feet can wait until you know what kind of quilting you enjoy.
| Tool | Why You Need It | Beginner Tip |
|---|---|---|
| Fabric scissors or rotary cutter | Cuts fabric pieces | A rotary cutter is faster, but sharp scissors work for practice. |
| Cutting mat | Protects your table when using a rotary cutter | Choose a self-healing mat if possible. |
| Quilting ruler | Helps measure and cut straight lines | A 6 x 12 inch or 6 x 24 inch ruler is useful. |
| Sewing machine or hand needle | Joins fabric pieces | A basic straight stitch is enough. |
| Thread | Holds seams together | Use all-purpose cotton or polyester thread. |
| Pins or clips | Keeps pieces aligned | Pin at seam intersections for accuracy. |
| Iron and ironing board | Presses seams flat | Press, do not scrub back and forth. |
| Seam ripper | Removes mistakes | Every quilter uses one. It is not a sign of failure. |
If you are using a sewing machine, you may also want a quarter-inch presser foot, but it is not required. You can mark a seam guide with painter’s tape on the machine bed. The key is sewing the same seam width every time.
Beginner Quilting Terms You Will See Right Away
A few quilting terms appear in almost every pattern. Learning them early makes instructions much easier to follow.
Block: A sewn unit that becomes part of a quilt top. The four-patch is a simple block.
Patch: One piece of fabric in a block.
Seam allowance: The distance between the fabric edge and the stitching line. Quilting commonly uses a quarter-inch seam allowance.
Right sides together: Placing the printed or “front” sides of two fabrics facing each other before sewing.
Pressing: Using the iron to flatten seams. Pressing is different from ironing clothing because you lift and place the iron instead of sliding it around.
Nesting seams: Pressing seams in opposite directions so they fit snugly together when joined.
Choosing Fabric for Your First Practice Block
For a first quilt block, choose quilting cotton. It is stable, easy to press, widely available, and less slippery than satin, knit, or stretchy fabric.
Use two fabrics with clear contrast, such as a light fabric and a dark fabric. This makes it easier to see the four-patch design and notice whether your seams line up. Avoid large prints for your first block because the design can hide your stitching and make small pieces look confusing.
Prewashing is optional for a practice block. If you plan to turn several blocks into a finished quilt, prewash all fabrics or none of them so they behave consistently. Press fabric before cutting so wrinkles do not distort your measurements.
Before You Sew: Cutting and Seam Accuracy Basics
Two habits make the biggest difference in beginner quilting: accurate cutting and consistent seam allowance.
For cutting, place fabric flat and smooth. If using a ruler and rotary cutter, align the ruler line with the fabric edge, keep your hand steady on the ruler, and cut away from your body. If using scissors, mark the cutting line lightly and cut slowly so the fabric does not shift.
For seam accuracy, quilting usually uses a quarter-inch seam. If your seam is too wide, the finished block will be too small. If it is too narrow, the block may be too large or less secure.
Before sewing your block, test your seam on two scrap strips. Sew them together, press the seam, and measure. If the seam is not a quarter inch, adjust your guide. On a machine, you can use a quarter-inch foot, the needle plate markings, or a strip of painter’s tape as a visual guide.
Pressing also affects accuracy. Set the seam first by placing the iron briefly on the closed seam. Then open or press to one side according to the instructions. For a four-patch, pressing seams to opposite sides helps them nest neatly.
Simple Beginner Block Tutorial: Four-patch Quilt Block
A four-patch block is made from four equal squares: two of one fabric and two of another. This tutorial makes one basic block from 3-inch squares. With quarter-inch seams, the unfinished block will measure about 5 1/2 inches square.
Materials
- Two 3-inch squares of light quilting cotton
- Two 3-inch squares of dark quilting cotton
- Thread
- Pins or clips
- Iron
- Sewing machine or hand-sewing needle
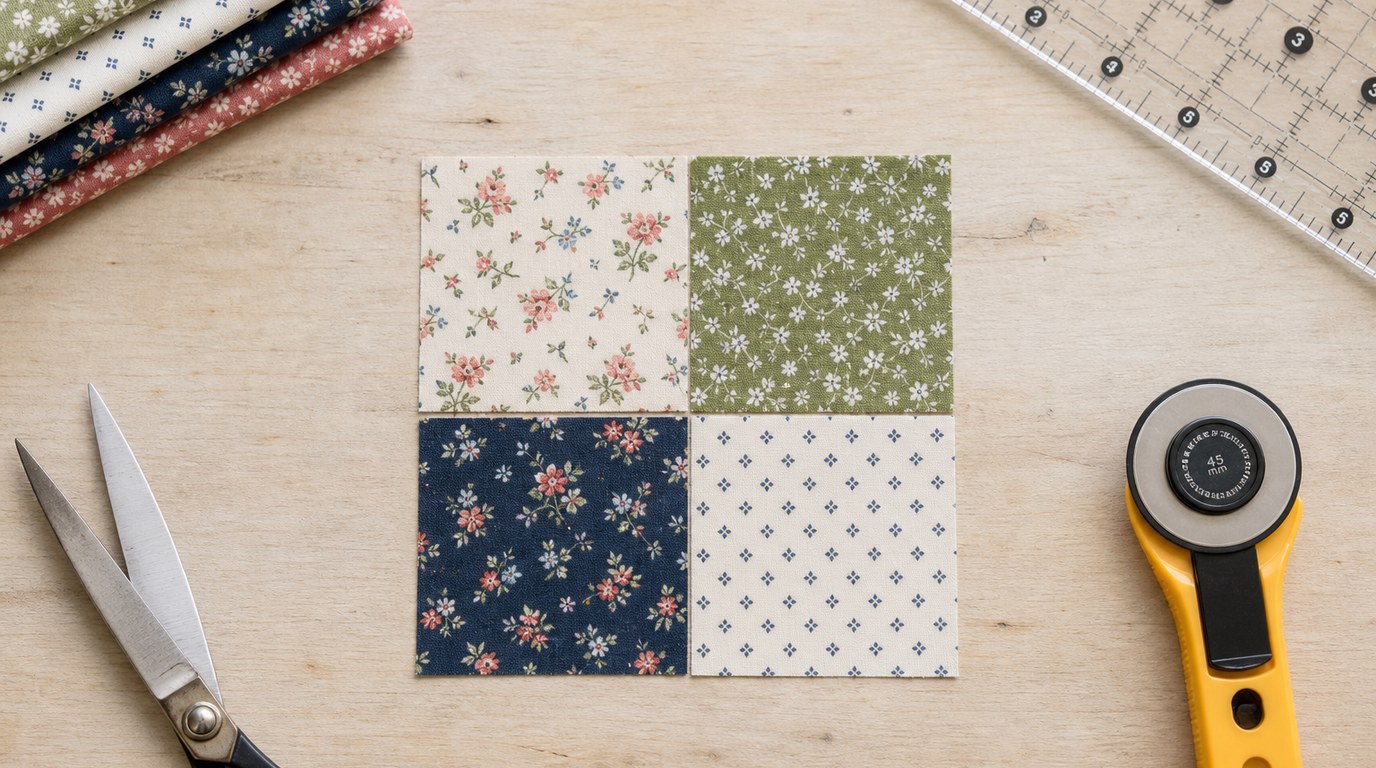
Step 1: Arrange the Squares
Lay out the four squares in two rows of two. Place the light and dark fabrics diagonally from each other, like a checkerboard:
- Top row: light, dark
- Bottom row: dark, light
Take a quick photo if you want to remember the layout.
Step 2: Sew the Top Row
Place the two top-row squares right sides together. Align the edges carefully. Sew along one side using a quarter-inch seam allowance.
Press the seam toward the darker fabric. This helps prevent the darker seam allowance from showing through the light fabric.
Step 3: Sew the Bottom Row
Place the two bottom-row squares right sides together. Sew with the same quarter-inch seam allowance.
Press this seam toward the darker fabric too. Because the dark fabric is on the opposite side in this row, the seams should point in opposite directions when the rows are placed together.
Step 4: Join the Rows
Place the top row and bottom row right sides together. Match the center seam first. The seam allowances should nest, meaning they butt up against each other in opposite directions.
Pin at the center seam, then align the outside edges. Sew across the row using a quarter-inch seam allowance.
Step 5: Press the Block
Press the final seam to one side, or press it open if that helps the block lie flatter. Lift and place the iron rather than pushing it around.
Turn the block over and check the front. You should see four squares meeting near the center. The block may not be perfect, and that is fine. This small block has taught you the basic rhythm of quilting: cut, sew, press, check.
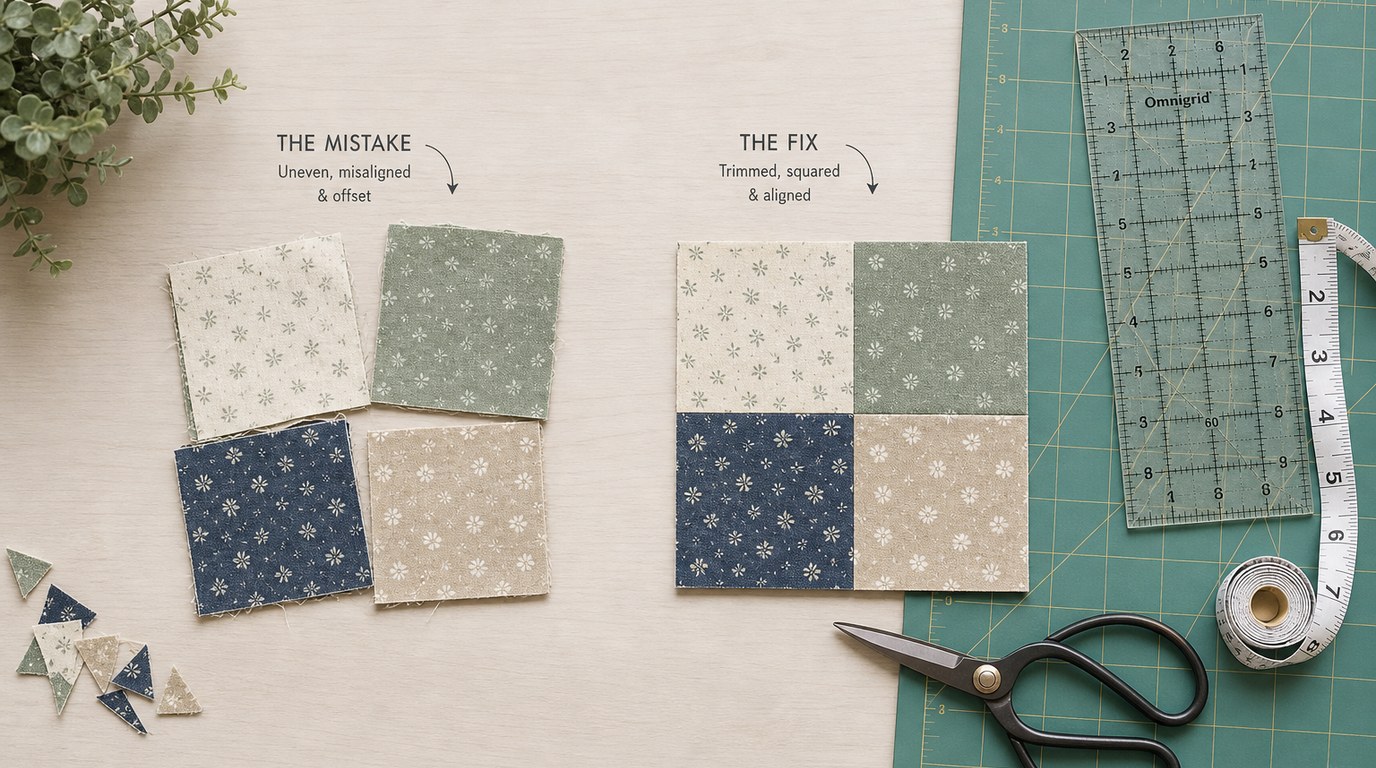
How to Check Your Block Without Getting Discouraged
Check your block for learning, not judgment. First, measure the finished size. If you started with four 3-inch squares and used quarter-inch seams, the block should be about 5 1/2 inches unfinished.
Next, look at the center where the four squares meet. If the points are slightly off, notice why. Did the fabric shift? Was one seam wider? Did you skip pinning?
Finally, check whether the block lies flat. A little waviness is common. Press again and see if it improves. Most beginner issues are fixable with steadier cutting, slower sewing, and careful pressing.
Common Beginner Quilting Mistakes and Easy Fixes
Mistake: Cutting pieces slightly different sizes.
Fix it by slowing down and measuring twice before cutting. For practice blocks, trim pieces to match before sewing.
Mistake: Sewing an uneven seam allowance.
Use a seam guide, tape marker, or quarter-inch foot. Watch the fabric edge against the guide, not the needle.
Mistake: Pulling fabric through the machine.
Let the feed dogs move the fabric. Your hands should guide, not tug.
Mistake: Skipping pressing.
Press after each seam. Flat pieces are easier to match and measure.
Mistake: Expecting the first block to be perfect.
Your first block is a sample, not a test. Make a second one right away if you can. The improvement is often noticeable.
Mistake: Buying too many tools too soon.
Start with the basics. Add tools only when they solve a real problem you have experienced.
What to Make Next After Your First Block
After one four-patch block, make three more using the same measurements. Sew the four blocks together into a larger practice square. This gives you more experience matching seams without committing to a big quilt.
From there, try a nine-patch block, a rail fence block, or a small patchwork pillow cover. Leave full quilt layering, quilting, and binding for the next stage. Your first goal is confidence with accurate cutting, steady seams, and pressing.
FAQ
What Should a Beginner Know First About Beginning Quilting Basics Tools and a Simple Block?
A beginner should know that quilting starts with simple repeatable skills: cutting fabric accurately, sewing a consistent quarter-inch seam, pressing seams flat, and joining small pieces into blocks. A four-patch block is one of the easiest ways to practice those basics.
What Matters Most When Evaluating Beginning Quilting Basics Tools and a Simple Block?
The most important things are whether the tools help you cut, sew, and press accurately, and whether the block teaches a useful skill. Beginners do not need many specialty tools. A simple block with clear measurements is more valuable than a complicated project.
What Mistakes Should Readers Avoid with Beginning Quilting Basics Tools and a Simple Block?
Avoid buying too much equipment, using stretchy fabric, skipping pressing, and rushing your cutting. Also avoid judging your first block too harshly. Small mismatches are normal at the beginning and usually improve with a steadier seam allowance and better fabric handling.
What Is the Next Logical Step After Learning About Beginning Quilting Basics Tools and a Simple Block?
The next step is to repeat the same block several times. Repetition builds accuracy and confidence. After making a few four-patch blocks, try joining them together or move to another beginner block, such as a nine-patch or rail fence.