A fabric heart garland is an easy sewing project Valentines Day decorators can make with scraps, felt, ribbon, and basic sewing tools. The finished garland is a string of small fabric hearts you can hang on a mantel, doorway, shelf, classroom board, or child’s room. It is beginner-friendly, quick to customize, and forgiving if your stitching is not perfect. Plan on about one to two hours, depending on how many hearts you make and whether you choose flat, stuffed, or felt hearts.
| Project detail | Recommendation |
|---|---|
| Skill level | Beginner |
| Time needed | 1–2 hours |
| Best fabrics | Cotton, felt, linen scraps, flannel |
| Sewing method | Machine or hand sewing |
| Best for | Valentine’s decor, gifts, classroom crafts |
| Easy custom options | Lace, buttons, initials, pinking shears, embroidery |
Why This Valentine’s Day Sewing Project Works
This project works because it is simple, cute, and useful. You do not need a complicated pattern, perfect fitting, or expensive fabric. Each heart is small, so it is a good way to use scraps from other sewing projects. The repeated shape also helps beginners practice cutting, stitching curves, and finishing edges without pressure.
A heart garland is also easy to adapt. Make it soft and romantic with florals and lace, bright and playful with red and pink prints, or simple and modern with solid felt.
Materials and Tools You’ll Need
Gather your supplies before you begin so the project moves smoothly.
You will need:
- Fabric scraps, felt, or quilting cotton
- Heart template, printed or hand-drawn
- Fabric scissors or rotary cutter
- Pins or fabric clips
- Sewing machine or hand-sewing needle
- Thread to match or contrast
- Ribbon, twine, bias tape, or yarn for the garland
- Polyester stuffing, if making stuffed hearts
- Iron and ironing board, if using cotton fabric
- Fabric marker, chalk, or pencil
- Optional: pinking shears, lace, buttons, embroidery floss, rickrack, fabric glue
If you are sewing with children, felt is the easiest option because it does not fray and usually does not need turning or pressing.
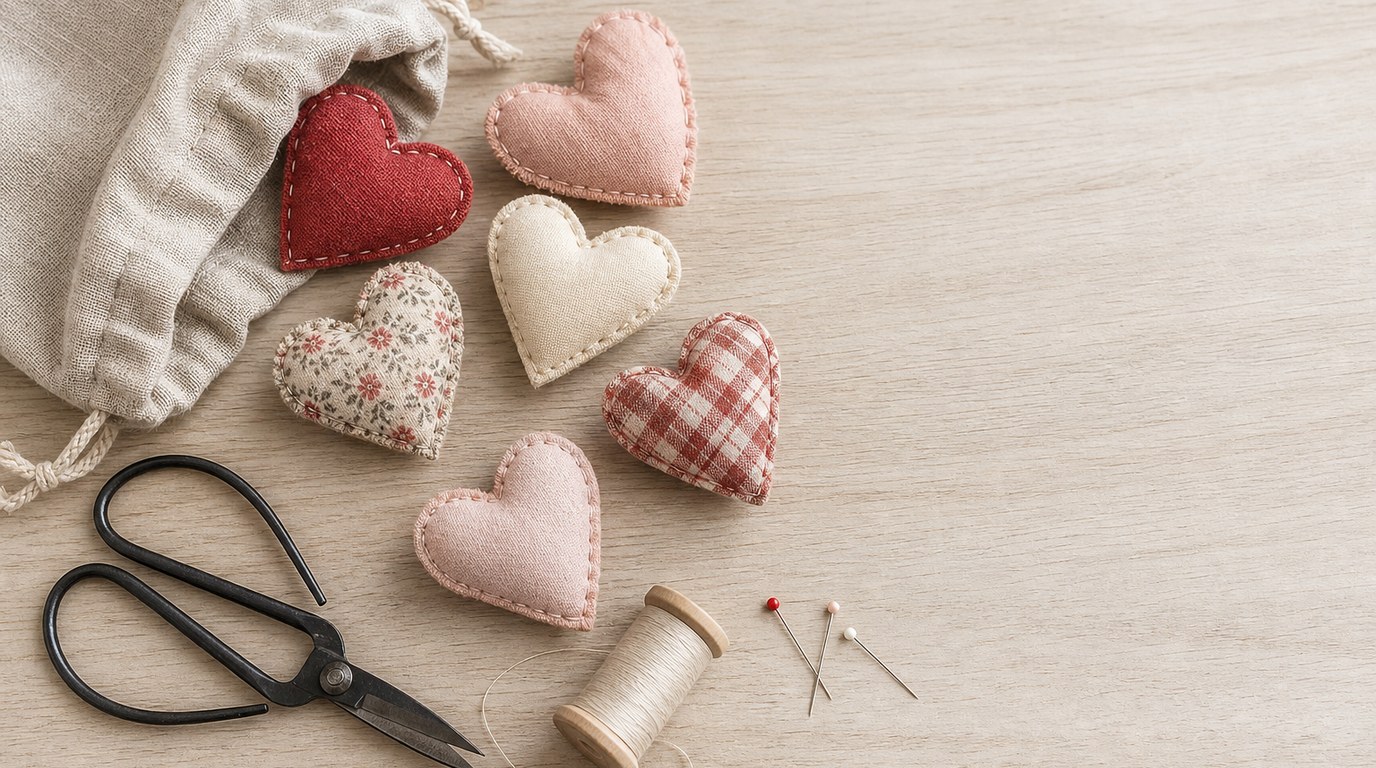
Choose Your Heart Style: Flat, Stuffed, or Felt
Before cutting, decide which heart style you want. Each version uses the same basic shape but gives a different look.
Flat fabric hearts are made from two fabric pieces stitched together. They are light, easy to hang, and use very little fabric. Stuffed hearts are sewn like tiny pillows with a small amount of filling inside. They look soft and dimensional but take a little longer. Felt hearts are the fastest because felt edges stay neat without turning.
For a first project, choose felt or flat cotton hearts. If you want a garland that feels more like a handmade keepsake, choose stuffed hearts.
Step 1: Make or Print a Heart Template
Draw a heart on paper or print a simple heart outline. A heart that is 3 to 5 inches tall works well for a garland. Smaller hearts are cute but harder to sew neatly, while very large hearts can feel heavy on the string.
Cut out the paper heart and fold it in half to check that both sides match. If needed, trim the edges until the shape looks balanced. This template will keep every fabric heart the same size.
Step 2: Cut the Fabric Hearts
Place the template on the wrong side of your fabric and trace around it with a fabric marker or pencil. For each heart, cut two matching pieces unless you are using a single-layer felt design. If your fabric has a directional print, such as stripes or words, make sure the design faces the way you want before cutting.
Pin or clip the fabric layers together before sewing. For cotton hearts, place the right sides together if you plan to turn them right side out. For felt hearts, you can place the wrong sides together and sew around the outside, leaving the stitching visible.
Cut slowly around the curves for smoother results.
Step 3: Sew the Hearts
For flat cotton hearts, sew around the heart with a 1/4-inch seam allowance, leaving a small opening on one straight-ish side for turning. Backstitch at the start and end so the seam does not come loose. Clip small notches into the curved seam allowance, being careful not to cut through the stitches. Turn the heart right side out through the opening.
For stuffed hearts, follow the same steps, but add a small amount of polyester stuffing before closing the opening. Use just enough stuffing to give shape without making the heart bulky. Too much filling can strain the seams.
For felt hearts, sew around the outside edge with a straight stitch or blanket stitch. You can leave the edges raw because felt does not fray. Add stuffing if desired, or keep the hearts flat for a lighter garland.
If sewing by hand, use small running stitches or backstitches. Keep the stitches close together so the edges hold well.
Step 4: Press, Trim, and Finish the Edges
Press cotton hearts gently with an iron to flatten the seams and improve the shape. Use the tip of a blunt tool, such as a chopstick, to smooth the curves from the inside before pressing. Do not push too hard at the point of the heart.
Close any turning openings with a ladder stitch by hand, or topstitch around the heart on your sewing machine. For felt hearts, trim uneven edges with scissors or pinking shears.
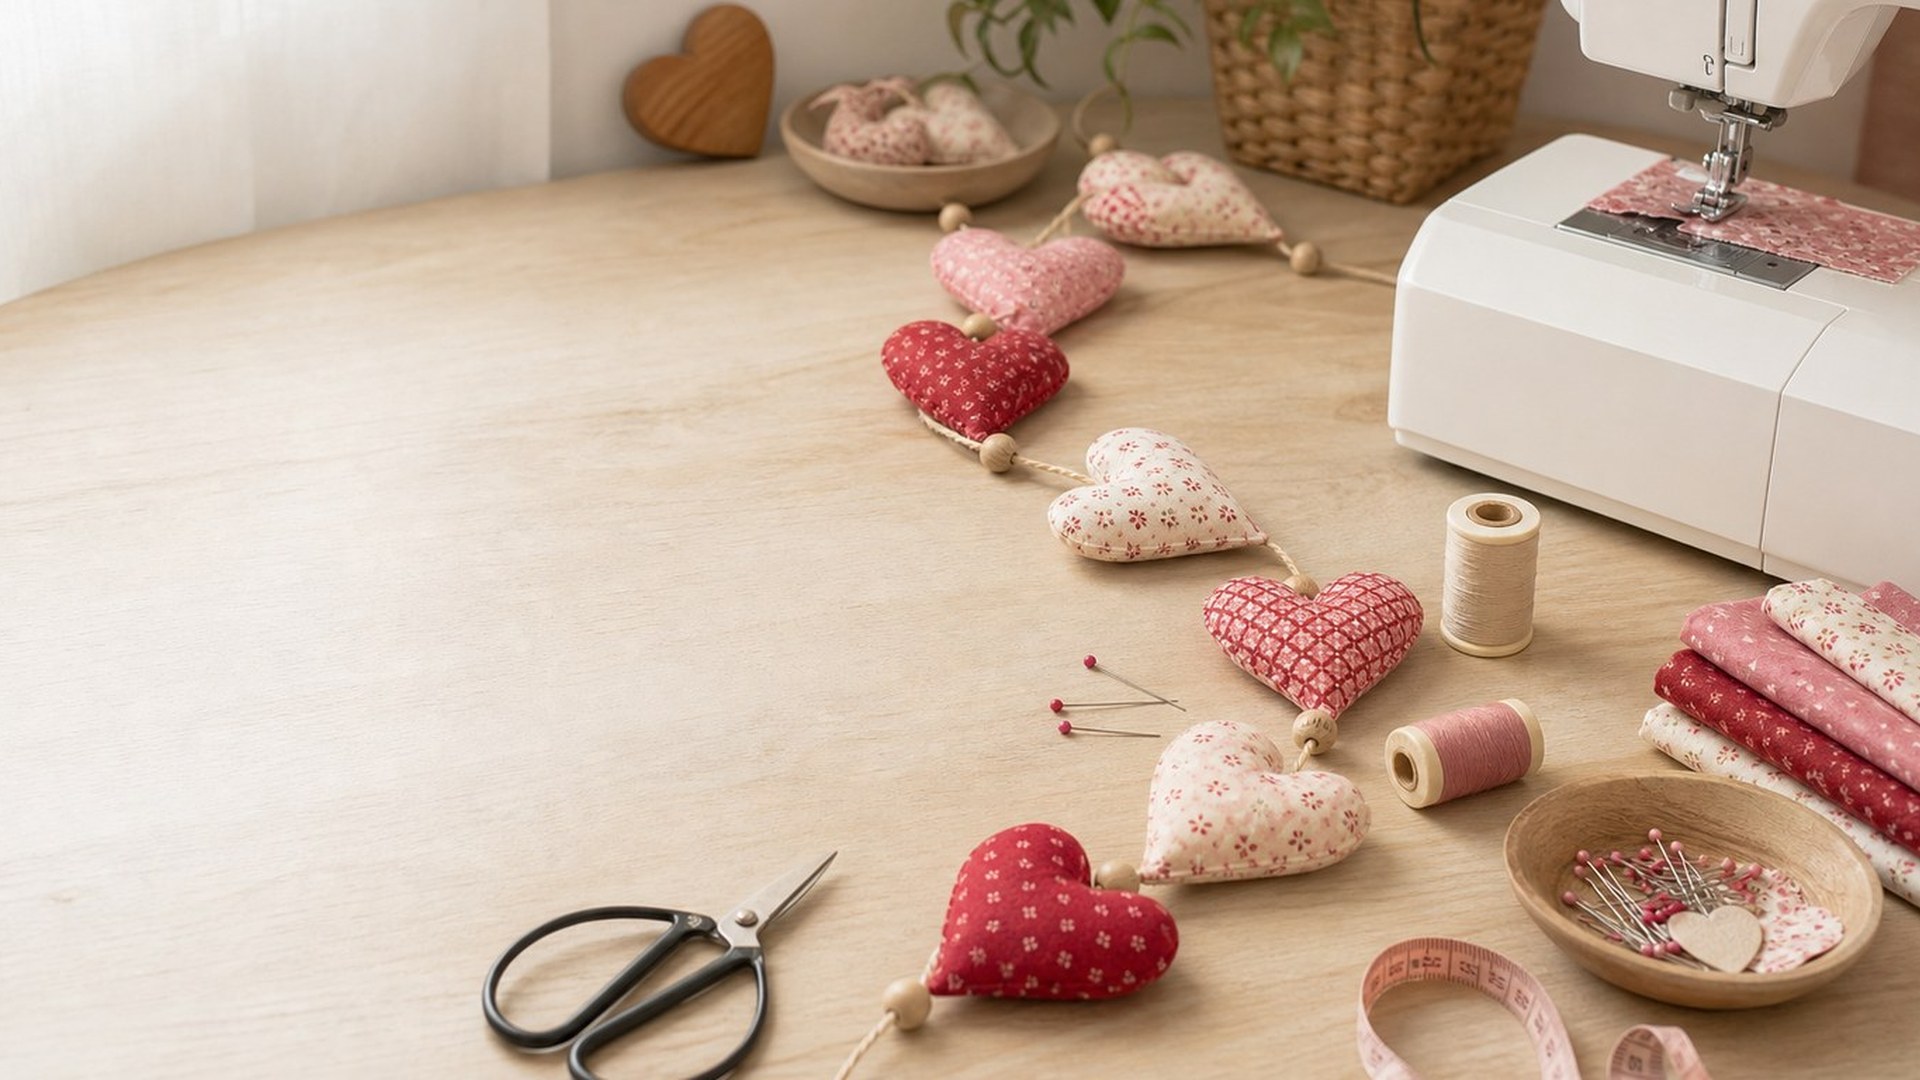
Step 5: Attach the Hearts to a Garland
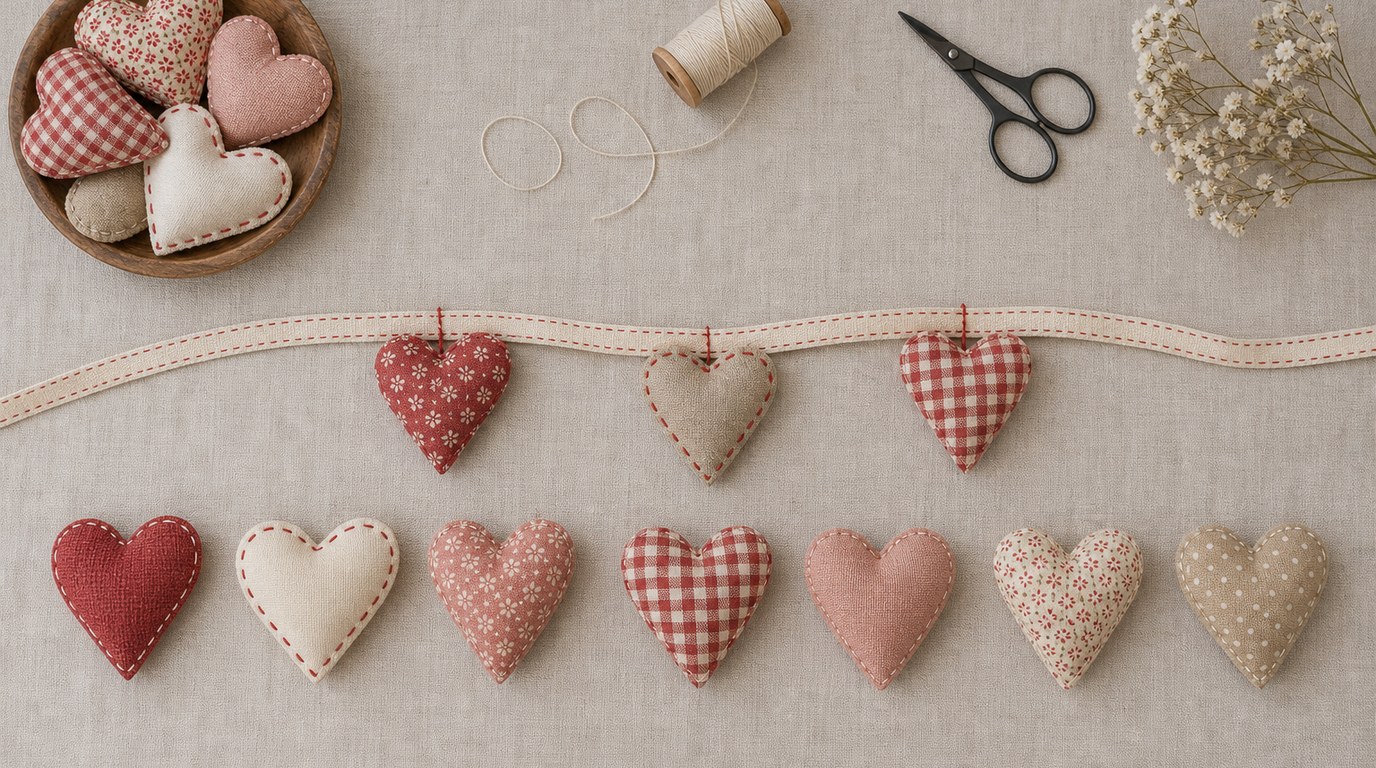
Lay your hearts on a table in the order you want them to hang. Space them evenly, usually 2 to 4 inches apart. Cut a length of ribbon, twine, yarn, or bias tape that fits your display area, adding extra at both ends for tying.
There are several easy ways to attach the hearts. Sew across the top of each heart directly onto ribbon. Stitch small loops of thread to the back and slide the garland string through them. Clip the hearts to twine with mini clothespins for a no-sew finish. You can also sandwich the tops of the hearts inside folded bias tape and stitch along the tape.
Before sewing everything permanently, lift the garland to check that the hearts face forward and hang evenly.
Easy Ways to Customize the Project
Small details make this Valentine’s garland feel personal. Try using a mix of red, pink, white, and floral fabrics. Add lace across the front of a heart before sewing the layers together. Stitch initials, short words, or tiny flowers with embroidery floss. Sew buttons in the center, or add rickrack across the top edge.
For a softer look, use flannel or linen scraps. For a bright classroom project, use craft felt in several colors. You can also alternate hearts with fabric bows, pom-poms, or small pennant flags, as long as the garland does not get too heavy.
Beginner Tips for a Neater Finish
Use sharp scissors so the heart curves cut cleanly. Sew slowly around the top dip and lower point of the heart; those are the areas most likely to look uneven. If using cotton, press the fabric before cutting and again after sewing.
Do not worry if every heart is not identical. A handmade garland looks charming with slight variation. If one heart turns out messy, use it as a test piece for thread tension, stuffing amount, or stitch length.
What to Do with Your Finished Valentine’s Garland
Hang your finished garland across a mantel, window, bookshelf, mirror, or headboard. It also makes a sweet decoration for a sewing room, nursery, classroom, or Valentine’s party table. If you make a shorter version, tie it around a gift box or hang it on a wreath.
After Valentine’s Day, store the garland flat in a small box or fabric bag so the hearts keep their shape for next year.
Final Check Before You Hang It
Before hanging, check each heart for loose threads, open seams, or uneven stuffing. Tug gently on the ribbon or twine to make sure every heart is secure. Trim thread tails and press any wrinkled cotton pieces one last time.
This is a small project, but it teaches useful sewing skills: cutting a template, sewing curves, finishing edges, and assembling a decoration. Once you have made one garland, it is easy to repeat for other holidays.
FAQ
What Is the Easiest Valentine’s Day Sewing Project for Beginners?
A fabric heart garland is one of the easiest Valentine’s Day sewing projects for beginners. The shapes are simple, the supplies are basic, and the finished decoration is useful. Felt hearts are the simplest version because they do not fray and do not need turning.
Can I Sew This Valentine’s Project by Hand?
Yes, you can sew this project by hand. Use a running stitch, backstitch, or blanket stitch around the heart edges. Hand sewing takes longer than machine sewing, but it works well for felt hearts, small stuffed hearts, and decorative stitching.
What Fabric Is Best for Valentine’s Heart Garland?
Cotton fabric and felt are the best choices. Quilting cotton is easy to press, cut, and sew, while felt is quick because the edges stay neat without hemming. Flannel, linen scraps, and lightweight denim can also work if they are not too bulky.
How Many Hearts Do I Need for a Garland?
For a small garland, make 5 to 7 hearts. For a mantel, doorway, or window, make 9 to 12 hearts. The exact number depends on the heart size and spacing. Lay the hearts out before attaching them so you can adjust the length.