A stepping stone quilt block is built from simple patchwork units arranged so the darker or feature fabric appears to “step” across the block. For a beginner-friendly version, make a 12-inch finished block from four-patch corner units, split side units, and one center square. The key is not difficult sewing; it is accurate cutting, consistent 1/4-inch seams, and careful layout before joining the rows. Variations exist, but this tutorial focuses on one clear block you can cut, sew, press, and square up with confidence.
Quick Answer
The main takeaway: a stepping stone quilt block is easiest to make when you treat it as a nine-patch layout made from smaller units. Instead of sewing many loose pieces together at once, you first make the corner four-patches and side units, then arrange those nine sections into three rows.
This tutorial makes one 12 1/2-inch unfinished block, which finishes at 12 inches when sewn into a quilt.
Use three fabrics:
- Background fabric: light or low-volume fabric
- Stone fabric: medium or dark fabric that creates the stepping effect
- Center fabric: feature square, either matching the stone fabric or contrasting with it
Cut the following pieces before sewing:
| Fabric | Cut | Quantity | Use |
|---|---|---|---|
| — | —: | —: | — |
| Background | 2 1/2" squares | 8 | Corner four-patches |
| Background | 2 1/2" x 4 1/2" rectangles | 4 | Side units |
| Stone fabric | 2 1/2" squares | 8 | Corner four-patches |
| Stone fabric | 2 1/2" x 4 1/2" rectangles | 4 | Side units |
| Center fabric | 4 1/2" square | 1 | Center of block |
Sew with a consistent 1/4-inch seam allowance. Press seams toward the darker fabric when possible, but prioritize seams nesting neatly when joining rows. After assembly, the block should measure 12 1/2 inches square. If it is slightly large, trim evenly. If it is small, check seam allowance and pressing before making more blocks.
How to Think About This Topic
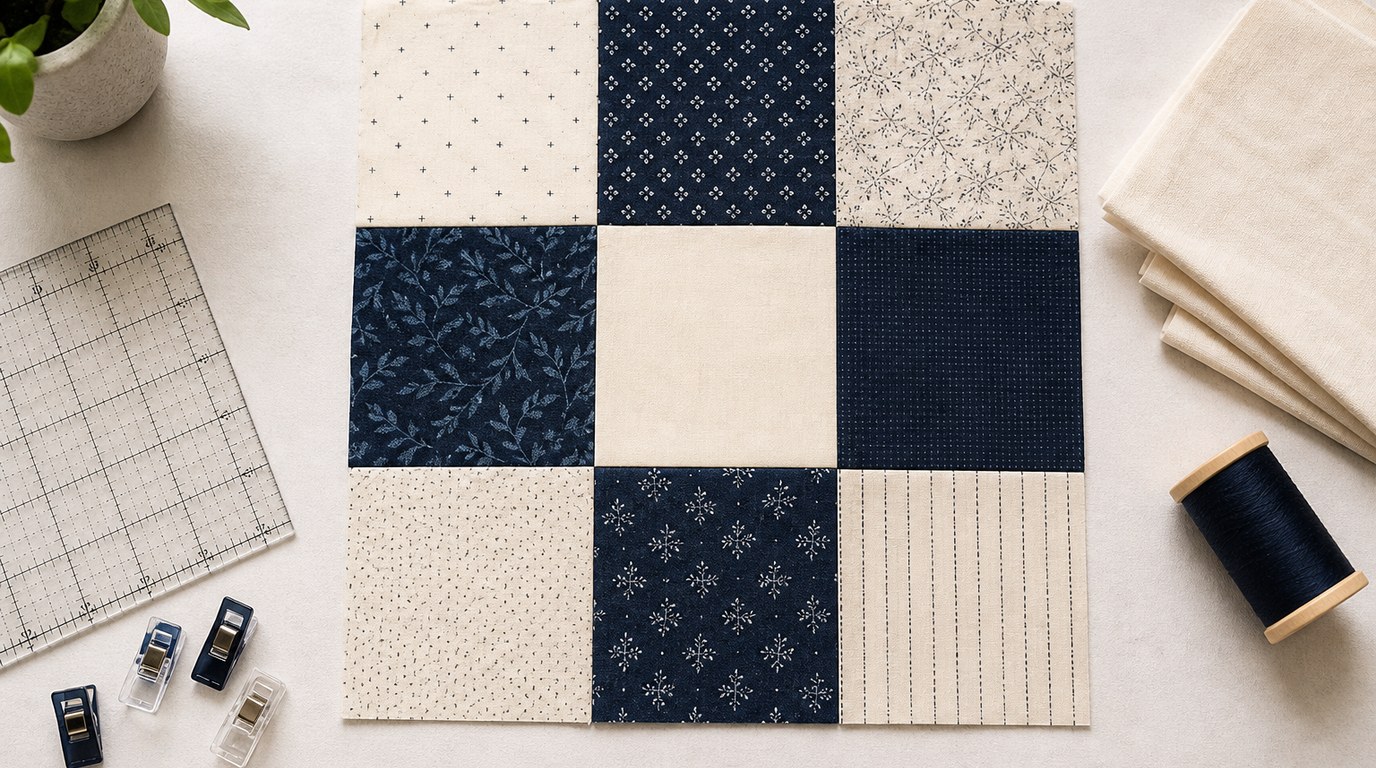
The easiest way to understand a stepping stone quilt block is to picture it as a grid. This version uses a three-by-three block structure, like a nine-patch. Each section of the grid finishes at 4 inches, and the full block finishes at 12 inches.
The “stepping stone” look comes from contrast. Your stone fabric should be noticeably different from the background fabric. If the two fabrics are too similar in value, the block may still be neatly sewn, but the stepping pattern will disappear. Before cutting, place the fabrics side by side and squint at them. If you can still tell which fabric is light and which is dark, the contrast is likely strong enough.
The block has three kinds of sections:
- Corner four-patches
These are made from 2 1/2-inch squares. Each four-patch finishes at 4 inches. The placement of the stone squares helps create movement around the block.
- Side units
These are made by sewing one background rectangle to one stone rectangle. Each finished side unit looks like a square split into two bands.
- Center square
This is one 4 1/2-inch square. It anchors the design and gives the stepping pieces something to move around.
Think of the construction in layers: cut accurately, make units, arrange the units, sew rows, join rows, then square up. That order matters because it keeps the block manageable. If you try to decide orientation while sewing each seam, it is easier to rotate a unit by mistake.
For this stepping stone quilt block, layout is just as important as sewing. After you make the units, place all nine sections on a table or design board before joining anything. Rotate the corner four-patches and side units until the stone fabric appears to move around the center rather than sitting randomly. A quick phone photo of the layout can help you check orientation if pieces get bumped.
Seam allowance also affects the finished size. Because this block uses several small sections, a seam that is even a little too wide can shrink the block. Test your 1/4-inch seam on scraps, press it, and measure before sewing the final pieces. A scant 1/4-inch seam is often helpful if your blocks tend to finish slightly small.
Pressing should support accuracy, not just make the block flat. In the four-patches, press toward the stone squares if possible. When joining the larger rows, check whether seams can nest in opposite directions. Nested seams help the intersections line up cleanly and keep the stepping pattern crisp.
Practical Guidance
Start by cutting all pieces from well-pressed fabric. If the fabric has wrinkles or a wavy fold, press it before cutting. Use a rotary cutter, ruler, and mat if available, and check that your 2 1/2-inch strips and rectangles are truly straight. Small cutting errors show quickly in a block built from grids.
Make the Corner Four-patches
You need four corner units. For each one, use two background 2 1/2-inch squares and two stone 2 1/2-inch squares.
Arrange them in a small two-by-two grid:
- One background square and one stone square in the top row
- One stone square and one background square in the bottom row
This creates a checkerboard four-patch. Sew the top two squares together, then the bottom two squares together. Press the two seams in opposite directions so they can nest. Join the two rows, matching the center seam. Press the final seam to one side or open, depending on which gives the flattest result.
Repeat to make four four-patch units. Each should measure 4 1/2 inches square. If one is off, fix it now rather than forcing it into the block later.
Make the Side Units
For each side unit, sew one background 2 1/2" x 4 1/2" rectangle to one stone 2 1/2" x 4 1/2" rectangle along the long edge. Press toward the stone fabric. Make four units. Each side unit should measure 4 1/2 inches square.
These units are simple, but orientation matters. In the final layout, rotate them so the stone rectangles help continue the stepping motion around the center square.
Lay Out the Block
Place the units in three rows:
| Row | Left | Center | Right |
|---|---|---|---|
| Row 1 | Four-patch | Side unit | Four-patch |
| Row 2 | Side unit | Center square | Side unit |
| Row 3 | Four-patch | Side unit | Four-patch |
Now rotate the four-patches and side units until you like the path of the stone fabric. A good beginner layout is to keep the darker pieces moving around the center, almost like a loose frame or path. The exact direction can vary, but the block should look intentional and balanced.
If you are using a directional print, such as stripes, text, or vines, decide whether all prints should face the same direction or whether rotation is part of the design. Directional fabric can make the block lively, but it also makes accidental rotation more obvious.
Sew the Rows
Sew the three units in Row 1 together. Then sew Row 2 and Row 3 the same way. Use pins at seam intersections if needed. Do not pull the fabric through the machine; guide it gently so the feed dogs can move it evenly.
Press Row 1 seams in one direction, Row 2 seams in the opposite direction, and Row 3 seams the same direction as Row 1. This alternating pressing helps seams nest when you join the rows.
Join and Square up
Sew Row 1 to Row 2, matching seams. Then sew Row 3 to the bottom. Press the final seams carefully. If the block feels bulky, press seams open for this step.
Measure the finished block. It should be 12 1/2 inches unfinished. Check the center, top, and bottom measurements both horizontally and vertically. If the block is slightly oversized, trim it to 12 1/2 inches, removing a little from opposite sides to keep the center balanced.
Avoid trimming a small block smaller to “make it square.” Instead, identify the issue: seam allowance too wide, pieces cut too small, or seams not fully pressed. Correct that before making additional stepping stone quilt blocks.
For a scrappy version, use several stone fabrics with similar value. For a cleaner modern version, use one background and one bold stone fabric. In either case, contrast is what makes the stepping stones readable.
FAQ
What Should a Beginner Know First About Stepping Stone Quilt Block?
A beginner should know that the stepping stone quilt block is mostly about layout and contrast. The sewing is straightforward if you build it in units first. Choose fabrics with clear light-dark difference, sew accurate 1/4-inch seams, and check each unit before assembling the full block.
What Matters Most When Evaluating Stepping Stone Quilt Block?
Accuracy matters most, especially unit size and seam alignment. Each corner and side unit should measure 4 1/2 inches before assembly. Also evaluate fabric contrast. If the stone fabric does not stand apart from the background, the stepping effect will be hard to see.
What Mistakes Should Readers Avoid with Stepping Stone Quilt Block?
Avoid rotating units randomly after you have chosen the layout. Take a quick photo before sewing rows together. Also avoid stretching seams, pressing with too much distortion, or ignoring small size errors in the four-patches. Small mistakes multiply across the finished block.
What Is the Next Logical Step After Learning About Stepping Stone Quilt Block?
After making one accurate block, make a few more using the same cutting and pressing method. Then experiment with fabric placement, scrappy stones, or alternating block rotations. Keep the finished size consistent so the blocks will join neatly if you later use them in a quilt.