Flying geese quilt blocks are made from one center triangle, called the “goose,” and two smaller side triangles, often called the “sky.” For beginning quilting, flying geese can look intimidating, but the basic stitch-and-flip method is approachable: sew small squares to the corners of a rectangle, trim away the extra fabric, and press the triangles open.
The key is accuracy. Cut carefully, sew on the marked line, press without stretching, and leave a 1/4-inch seam allowance above the point. Start with one unit at a time before trying faster methods. Once you understand the shape, flying geese are useful in borders, stars, arrows, and modern quilt designs.
What Is a Flying Geese Quilt Block?
A flying geese unit is a rectangle that is twice as wide as it is tall when finished. For example, a 2-by-4-inch finished unit is a classic flying geese size.
Visually, it looks like one large triangle pointing across the rectangle, with two background triangles on either side. The point of the center triangle should stop 1/4 inch below the top raw edge. That space becomes the seam allowance when you sew the unit into a quilt.
Think of flying geese as directional building blocks. They can point up, down, left, or right depending on how you rotate them.
Supplies and Fabric You’ll Need
For the beginner stitch-and-flip method, gather:
- Quilting cotton for the “goose” triangle
- Quilting cotton for the two “sky” triangles
- Rotary cutter, quilting ruler, and cutting mat
- Fabric marking pencil or removable pen
- Sewing machine and neutral thread
- Iron and pressing surface
- Small scissors or thread snips
- Optional: starch or fabric spray
Choose fabrics with good contrast for your first practice units. A darker goose fabric and lighter sky fabric make it easier to see the shape and check your accuracy.
Choose Your Flying Geese Size
Before cutting, decide the finished size you want. “Finished” means the size after the unit is sewn into a quilt. “Unfinished” means the size before it is sewn in, with seam allowance included.
Flying geese units usually finish at a 1:2 ratio: the width is twice the height. To make one unit at a time, cut one rectangle for the goose and two squares for the sky.
| Finished unit size | Unfinished unit size | Cut goose rectangle | Cut 2 sky squares |
|---|---|---|---|
| — | —: | —: | —: |
| 1" x 2" | 1 1/2" x 2 1/2" | 1 1/2" x 2 1/2" | 1 1/2" x 1 1/2" |
| 2" x 4" | 2 1/2" x 4 1/2" | 2 1/2" x 4 1/2" | 2 1/2" x 2 1/2" |
| 3" x 6" | 3 1/2" x 6 1/2" | 3 1/2" x 6 1/2" | 3 1/2" x 3 1/2" |
For beginners, a 2-by-4-inch finished unit is a comfortable practice size because the pieces are large enough to handle easily.
Beginner Method: Make One Flying Geese Unit at a Time
This one-at-a-time method is often called the stitch-and-flip method. It is simple, visual, and easy to correct as you go.
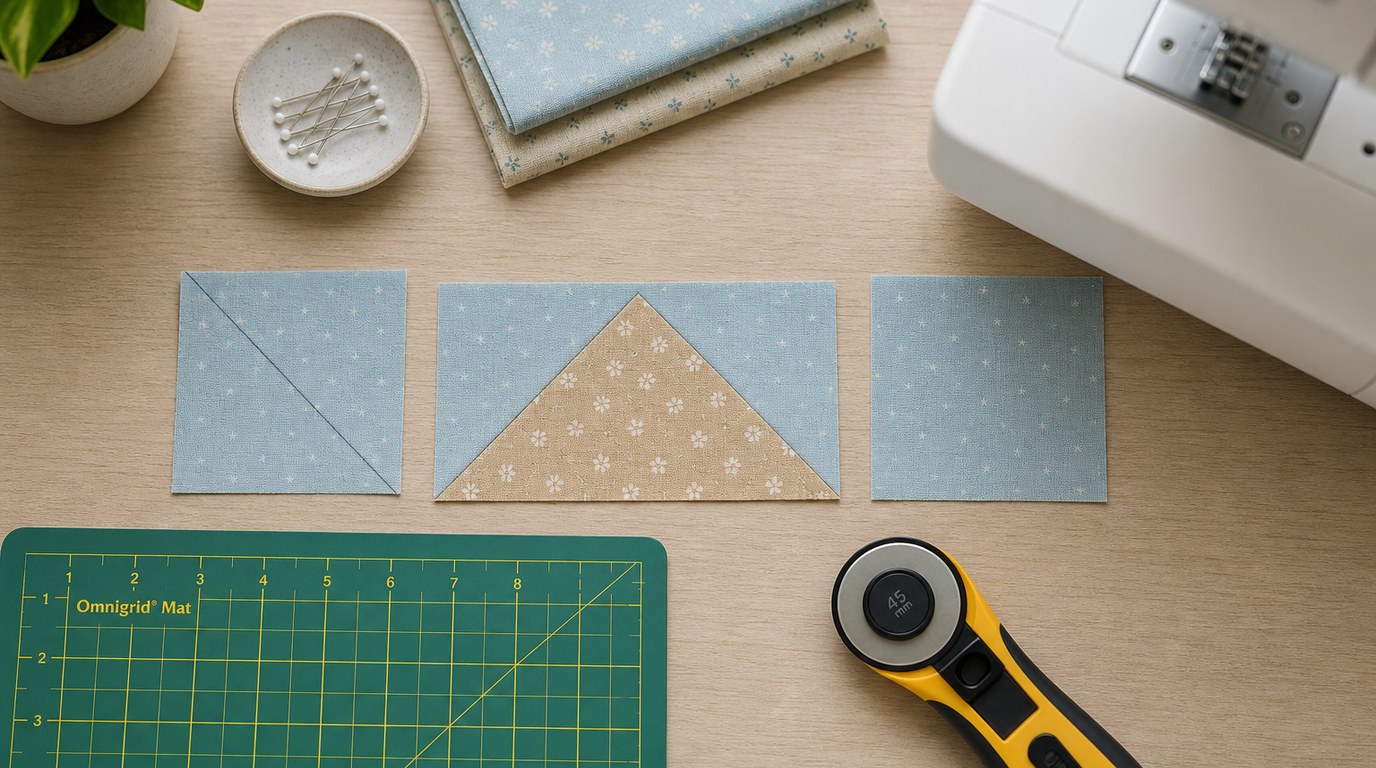
- Cut your fabric.
Cut one rectangle for the goose and two matching squares for the sky. For a 2-by-4-inch finished unit, cut one 2 1/2-by-4 1/2-inch rectangle and two 2 1/2-inch squares.
- Mark the first square.
On the wrong side of one sky square, draw a diagonal line from corner to corner.
- Place the first square.
Put the marked square right sides together on one end of the rectangle. Match the raw edges. The diagonal line should run from the top outer corner toward the center bottom of the rectangle.
- Sew on the line.
Stitch directly on the marked diagonal line. Sew slowly enough to stay accurate.
- Check before trimming.
Fold the square open along the stitched line to make sure it covers the corner of the rectangle. The raw edges should line up. If it does not cover the corner, unpick and resew before cutting.
- Trim the extra fabric.
Once the flipped triangle looks correct, trim away the extra layers behind it, leaving a 1/4-inch seam allowance.
- Press the triangle open.
Press the sky triangle toward the corner. Avoid dragging the iron back and forth.
- Repeat on the other side.
Mark the second sky square. Place it on the opposite end of the rectangle, right sides together. The diagonal line should angle from the top outer corner down toward the center, forming the goose point. Sew, check, trim, and press.
- Measure the unit.
Your unfinished unit should match the size you planned. For a 2-by-4-inch finished unit, it should measure 2 1/2 by 4 1/2 inches. Make sure the goose point has 1/4 inch of space above it.
Make one test unit before chain piecing several at once. That small test can save fabric and frustration.
How to Press Flying Geese Without Distorting Them
Flying geese have bias edges, which can stretch if handled roughly. Pressing well helps the unit stay flat and accurate.
Use an up-and-down pressing motion instead of sliding the iron. After sewing each diagonal seam, first press the seam as sewn to set the stitches. Then fold the sky triangle open and press it into place.
If your fabric feels shifty, use a little starch before cutting or after sewing. Let the unit cool on the ironing board before moving it, because warm fabric can stretch more easily.
How to Keep the Point from Disappearing
A disappearing point usually happens when the goose point is too close to the raw edge. When the unit is sewn into the quilt with a 1/4-inch seam, that point gets caught in the seam allowance.
To prevent this, check for 1/4 inch between the top point and the raw edge of the unit. If the point touches the edge, the seam line may be too far in or the unit may have been trimmed too aggressively.
When joining flying geese to other pieces, sew with the flying geese unit on top if possible. This lets you see the point and stitch just above it.
Optional: No-waste Flying Geese Method
The no-waste flying geese method makes four matching units at once from one large square and four smaller squares. It saves fabric and is efficient for patterns that need many identical flying geese.
However, it can feel less intuitive for a first attempt. You sew, cut, press, add more squares, sew again, and cut again. The method is excellent once you understand what a flying geese unit should look like.
If you are new to beginning quilting flying geese, learn the one-at-a-time stitch-and-flip method first. Then try the no-waste method for a star block, border, or repeating design.
Common Flying Geese Mistakes and Quick Fixes
- Unit is too small: Your seam may be too wide, or the fabric may have shifted. Check your 1/4-inch seam and pin if needed.
- Point is cut off: Make sure there is 1/4 inch above the point before joining units.
- Corners do not line up: Before trimming, fold the triangle open to check coverage.
- Unit is wavy: Press gently and avoid pulling on bias edges.
- Triangle looks crooked: Mark diagonal lines carefully and sew directly on the line.
- Fabric shows through: Use lighter background fabric over darker prints carefully, or trim seam allowances evenly.
Small inaccuracies are normal at first. Practice improves consistency.
Simple Practice Project Ideas
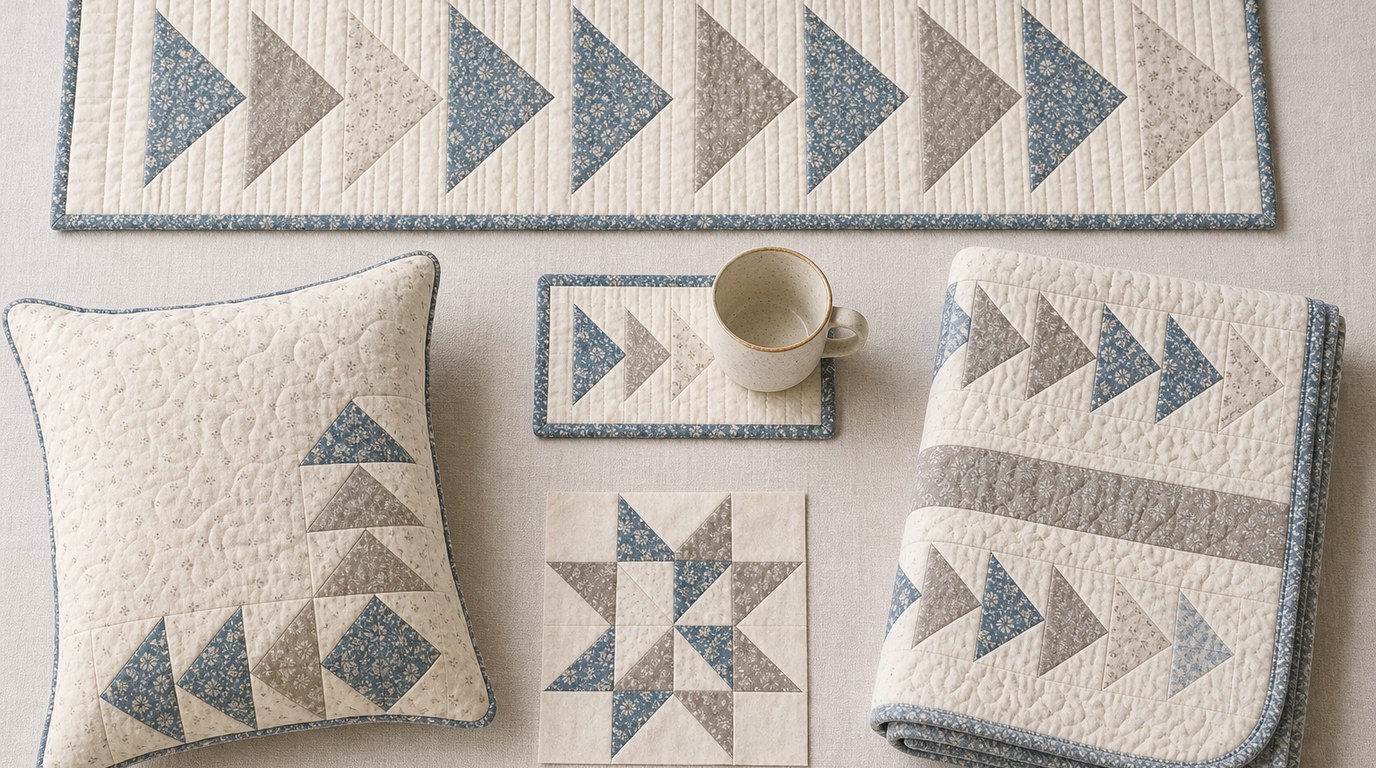
Once you can make a few neat flying geese units, use them in a small project instead of waiting for a full quilt.
Try a row of flying geese on a pillow front, mug rug, table runner border, or baby quilt strip. Four flying geese can also become part of a star block. For modern designs, arrange several units in one direction to create arrows or movement.
Start with scraps, make a small batch, and focus on matching size and points.
FAQ
What Should a Beginner Know First About Beginning Quilting Flying Geese?
Beginners should know that flying geese are rectangular units with one main triangle and two side triangles. The finished unit is usually twice as wide as it is tall. Accuracy matters most at the diagonal seams and at the 1/4-inch space above the point.
What Matters Most When Evaluating Beginning Quilting Flying Geese?
Look for correct size, flat pressing, straight diagonal seams, and a visible point with seam allowance above it. The unit should measure close to the intended unfinished size and lie flat without stretching or rippling.
What Mistakes Should Readers Avoid with Beginning Quilting Flying Geese?
Avoid trimming before checking that the flipped triangle covers the corner. Do not press by dragging the iron, because bias edges can stretch. Also avoid sewing the final seam directly through the point.
What Is the Next Logical Step After Learning About Beginning Quilting Flying Geese?
After making single units successfully, practice making several the same size. Then use them in a pillow, border, table runner, or star block. Once you are comfortable, try the no-waste method for faster batch sewing.